Please note: These pages are part of my RS 125 Workshop Page on my web blog and they are not related to the manufacturer Aprilia/Piaggio. These are self-written repair instructions, hints, tips and tricks for the old Aprilia RS 125 with two-stroke engine until year 2012. This blog is operated by a private individual without commercial background and without any benefits. There is absolutely no warranty. Any liability for any kind of damage that may be related to information from this website is totally denied. Use at your own risk.
By far the most commonly asked question about the RS 125 is how to properly set up the carburetor. With this article I would like to provide a short guide on how to adjust the carburetor. There are some instructions and tips on the Internet, from whose procedure here is sometimes different, which is in the end only due to the fact that this article was written specifically for the Aprilia RS 125 and of course has a personal style.
In an ideal situation, the objective is to ensure the appropriate combustion air ratio λ for each operating condition of the engine. In four-stroke engines, since about the 1990s, the residual oxygen content is measured by the lambda probe and the supplied air volume is measured by an air mass flow meter, which is used to electronically control the amount of fuel to be injected. The RS 125 has neither such a measurement nor such an adjustment option; instead, an attempt is made to provide a suitable fuel-air mixture through the fixed, mechanical adjustment options in the carburetor.
Basically, you have to understand here that carburetor jetting usually has to be determined by trial, error and experience. You have to understand the problem, know the appropriate adjusting points and then make a decision on which component you now want to make a change to. However, theories about combustion and the combustion air ratio remain theoretical without the possibility of measurement and do not help here.
Many components of the carburetor influence a wide range and not always in the way you would like. Therefore, you can never say exactly which problem can now be solved with which setting. The three common carburetors on the Aprilia RS 125 are slide carburetors and no equal-pressure carburetors. The throttle slide position is operated exclusively manually by the driver. This means that the engine’s behavior always depends directly on the driver.
You will find some carburetor setup tables on this blog, which have to be interpretated as a collection of possible carburetor settings and should in no way be taken as the ideal carburetor settings.
- Carburetor Jetting Chart for Dell’Orto PHBH 28 BD
- Carburetor Jetting Chart for Dell’Orto VHSB 34 LD
- Carburetor Jetting Chart for Dell’Orto VHST 28 CD
The factory settings will also be due to the applicable emission standards on the date of initial registration. For this reason, these factory settings are not always perfect, similar to the performance gap of the CDI. However, at least in Germany the exhaust emission test of already registered motorcycles without a regulated catalytic converter only has to comply with a CO value of 4.5% by volume at idle speed; the exhaust emission behavior of the engine is not tested any further. Theoretically, the tuning of the carburetor is not permitted, because the vehicle’s exhaust gas characteristics are changed and practically the exhaust gas characteristics are not measured and tested in the way that would be necessary for an certified exhaust gas measurement. Practically, however, noone cares about this. Sorry.
Since the RS 125 is already equipped with a suitable carburetor, there is usually no reason to change all components and the setup rarely has to be done new from scratch. It is recommended to start with the existing settings unless all things to comply to Euro3 emissions have been removed at the same time or the motorcycle has been completely rebuilt.
In basically, here’s what to do: You analyze where the problems are with the current carburetor jetting, make a decision to change a single component, and test how the bike behaves after the change. Based on experience, you have to do this a few times and this process is very time consuming. It is also recommended to write down each change with the observed behavior afterwards, because after three to four changes of main jet and needle you often already forget what has been done alreary.
Analysis
First, the current state must be determined. The question that must be answered is: In which range does the engine run badly and does it run too rich or too lean there? For this purpose, if you do not have the possibility to measure via a dynamometer with exhaust gas measurement, you can do the following things:
- In what rpm range, at what load and at what throttle position does the problem actually occur? Ideally, the motorcycle must be able to be driven smoothly in all gears from low rpm ranges to full throttle without jerking. All relevant components in the carburetor must be correctly adjusted and all sealings must be in proper condition. It must be ensured that the cause for bad engine performance is not a power gap in the CDI or an insufficient fuel supply.
- Use cold start boost: If you use the cold start boost (also known as “choke”) on the left handlebar while driving, a heavily over-fatted gasoline-air mixture is also added for a short time. It is just added for a short time, so just open it for a short or multiple times. If the engine runs better immediately when the cold start boost is activated, this indicates that the mixture is too lean in this area.
- Sound: A too lean mixture leads to premature ignition at high load, which is noticeable by a sound similar to ringing and knocking. A correctly ignited mixture causes an audible pressure wave in the exhaust, if this “Paff” sound remains completely absent during acceleration and the sound remains muffled, this also indicates a mixture that is much too lean in this area. A stuttering sound indicates a mixture that is too rich or way too lean.
- Driving behavior and characteristics: A mixture that is too rich often leads to completely irregular stuttering, which is accompanied by the sound described. Smoke at the exhaust can also indicate a too rich mixture. If the mixture is significantly too lean in the low rpm range, on the other hand, there is a rather uniform lack of engine power.
- The throttle grip should only be turned to such an extent that you still have control over the engine power with the throttle grip. This allows you to determine which component of the carburetor is actually decisive for the respective load range. You can usually tell that while driving: If a further turn of the throttle grip no longer causes any change, the throttle slide is already open too wide and the throttle grip is turned too far.
Test rides must be made in which the problematic load range is used as frequently as possible. It makes no sense to look at piston and spark plug patterns when there is jerking in the low rpm range, if you actually only move the motorcycle with a high load on a highway.
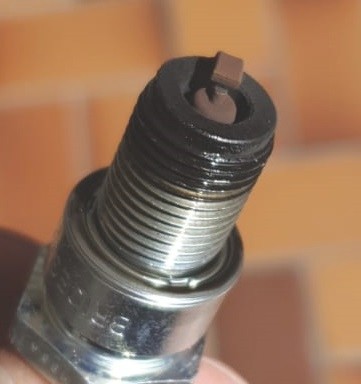
- Spark plug pattern: The combustion residue on the ground electrode of the spark plug comes approximately from the last 1-5 kilometers of driving and gives an indication of whether the mixture was too rich or too lean overall. Ideally, the color of the deposit is light brown-gray or “fawn” and never gray-white (too lean) or black (too rich). When looking at the deposit on the insulator and the face of the spark plug thread, the heat rating of the spark plug must be considered: A plug that is too cold (e.g. BR10EG) on engines without power restriction will not heat up when driving in low power ranges due to the high heat dissipation and is therefore of little significance in this range. The workaround here is to install a BR9EG or even BR8EG while setting up the carburetor.
- Piston head pattern: It takes many kilometers for the image on the piston crown to change and this also depends heavily on the driver. It is therefore not very suitable for short-term tests, but you can still tell from it how the machine has run overall over the longer, past period. The piston crown is mainly influenced by the main jet. The piston should look dry and gray in the center, and rather darker at the edges. On the piston crown you have to look for detonation traces of early ignitions, which occur when the mixture is too lean. A completely black, dark piston crown is a clear sign of a mixture that is too rich.
Usually, a more frequent look at the spark plug and an estimation of the driving experience and engine characteristics in the respective power ranges is sufficient to adjust the carburetor in such a way that the motorcycle becomes drivable without any jerking and stuttering.
Adjustment options on the carburetor
Theoretically, there are components for each amount of flow and each gas slide position, which should specifically control the mixture formation in these load ranges. In reality, it is a slide carburetor that cannot regulate its own gas slide position, and the components always influence a wider range.
From a pragmatic point of view, it therefore makes sense to work with existing components first before purchasing further individual parts for adjustments.
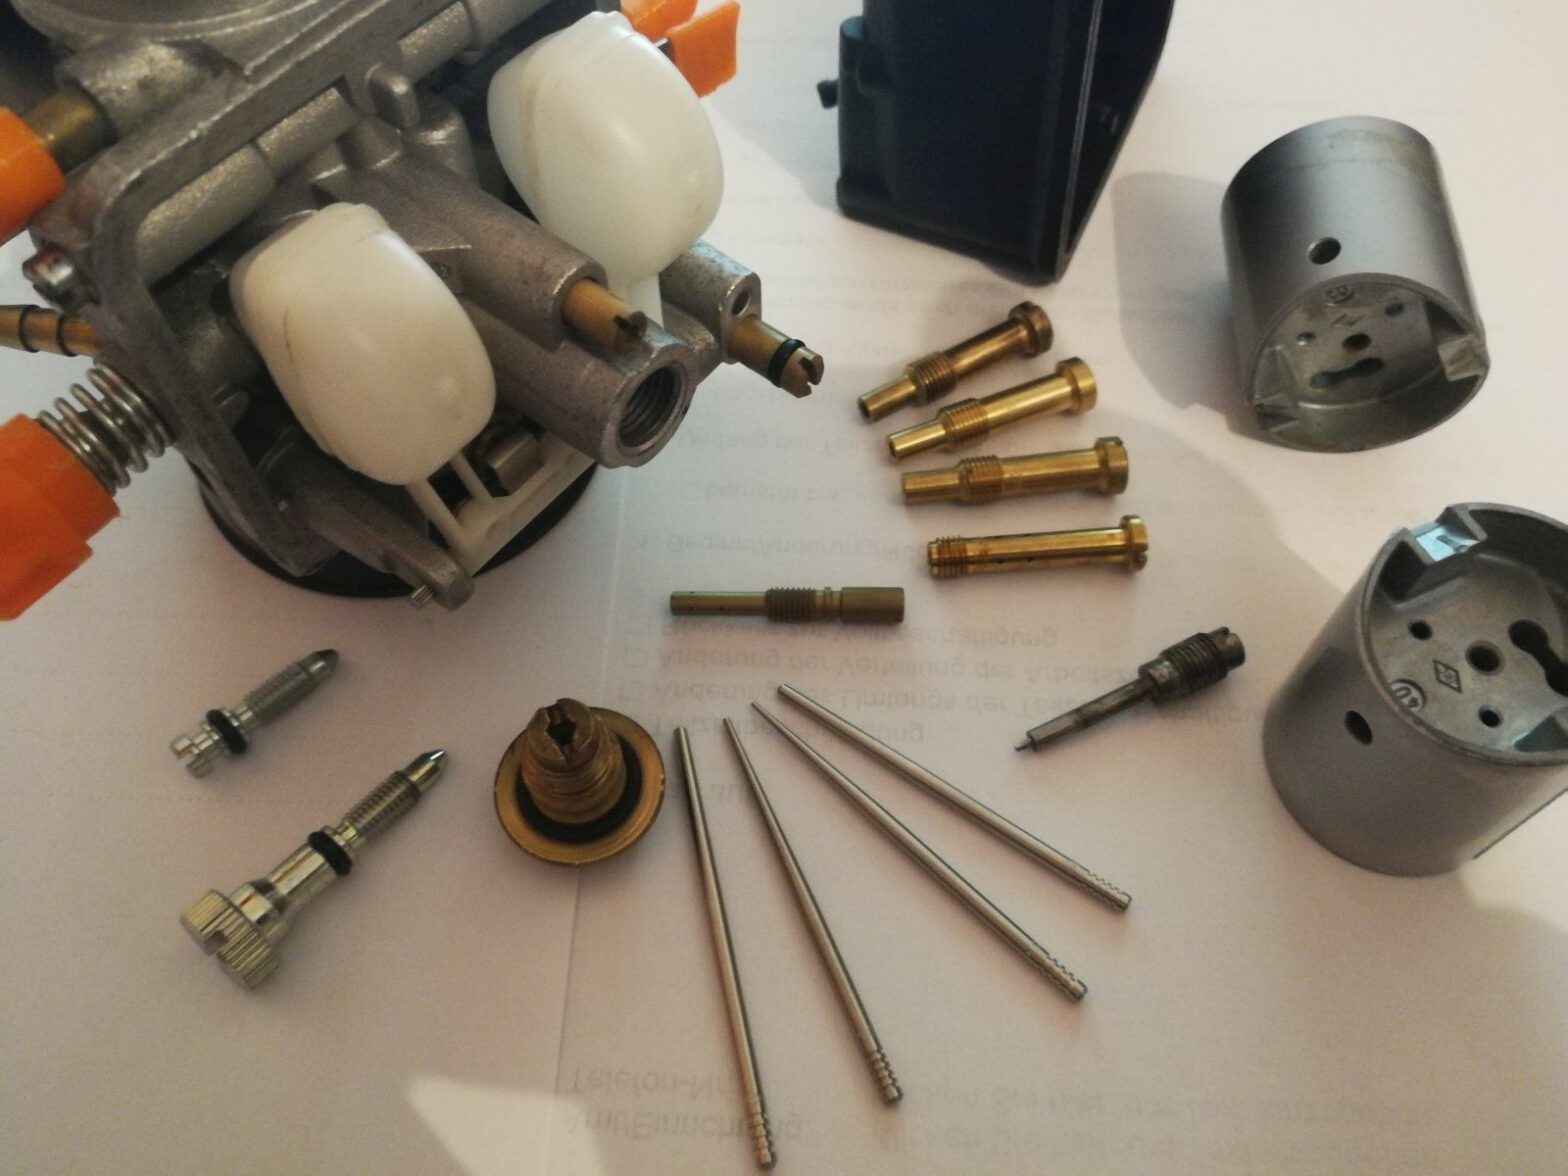
Carburetor Components
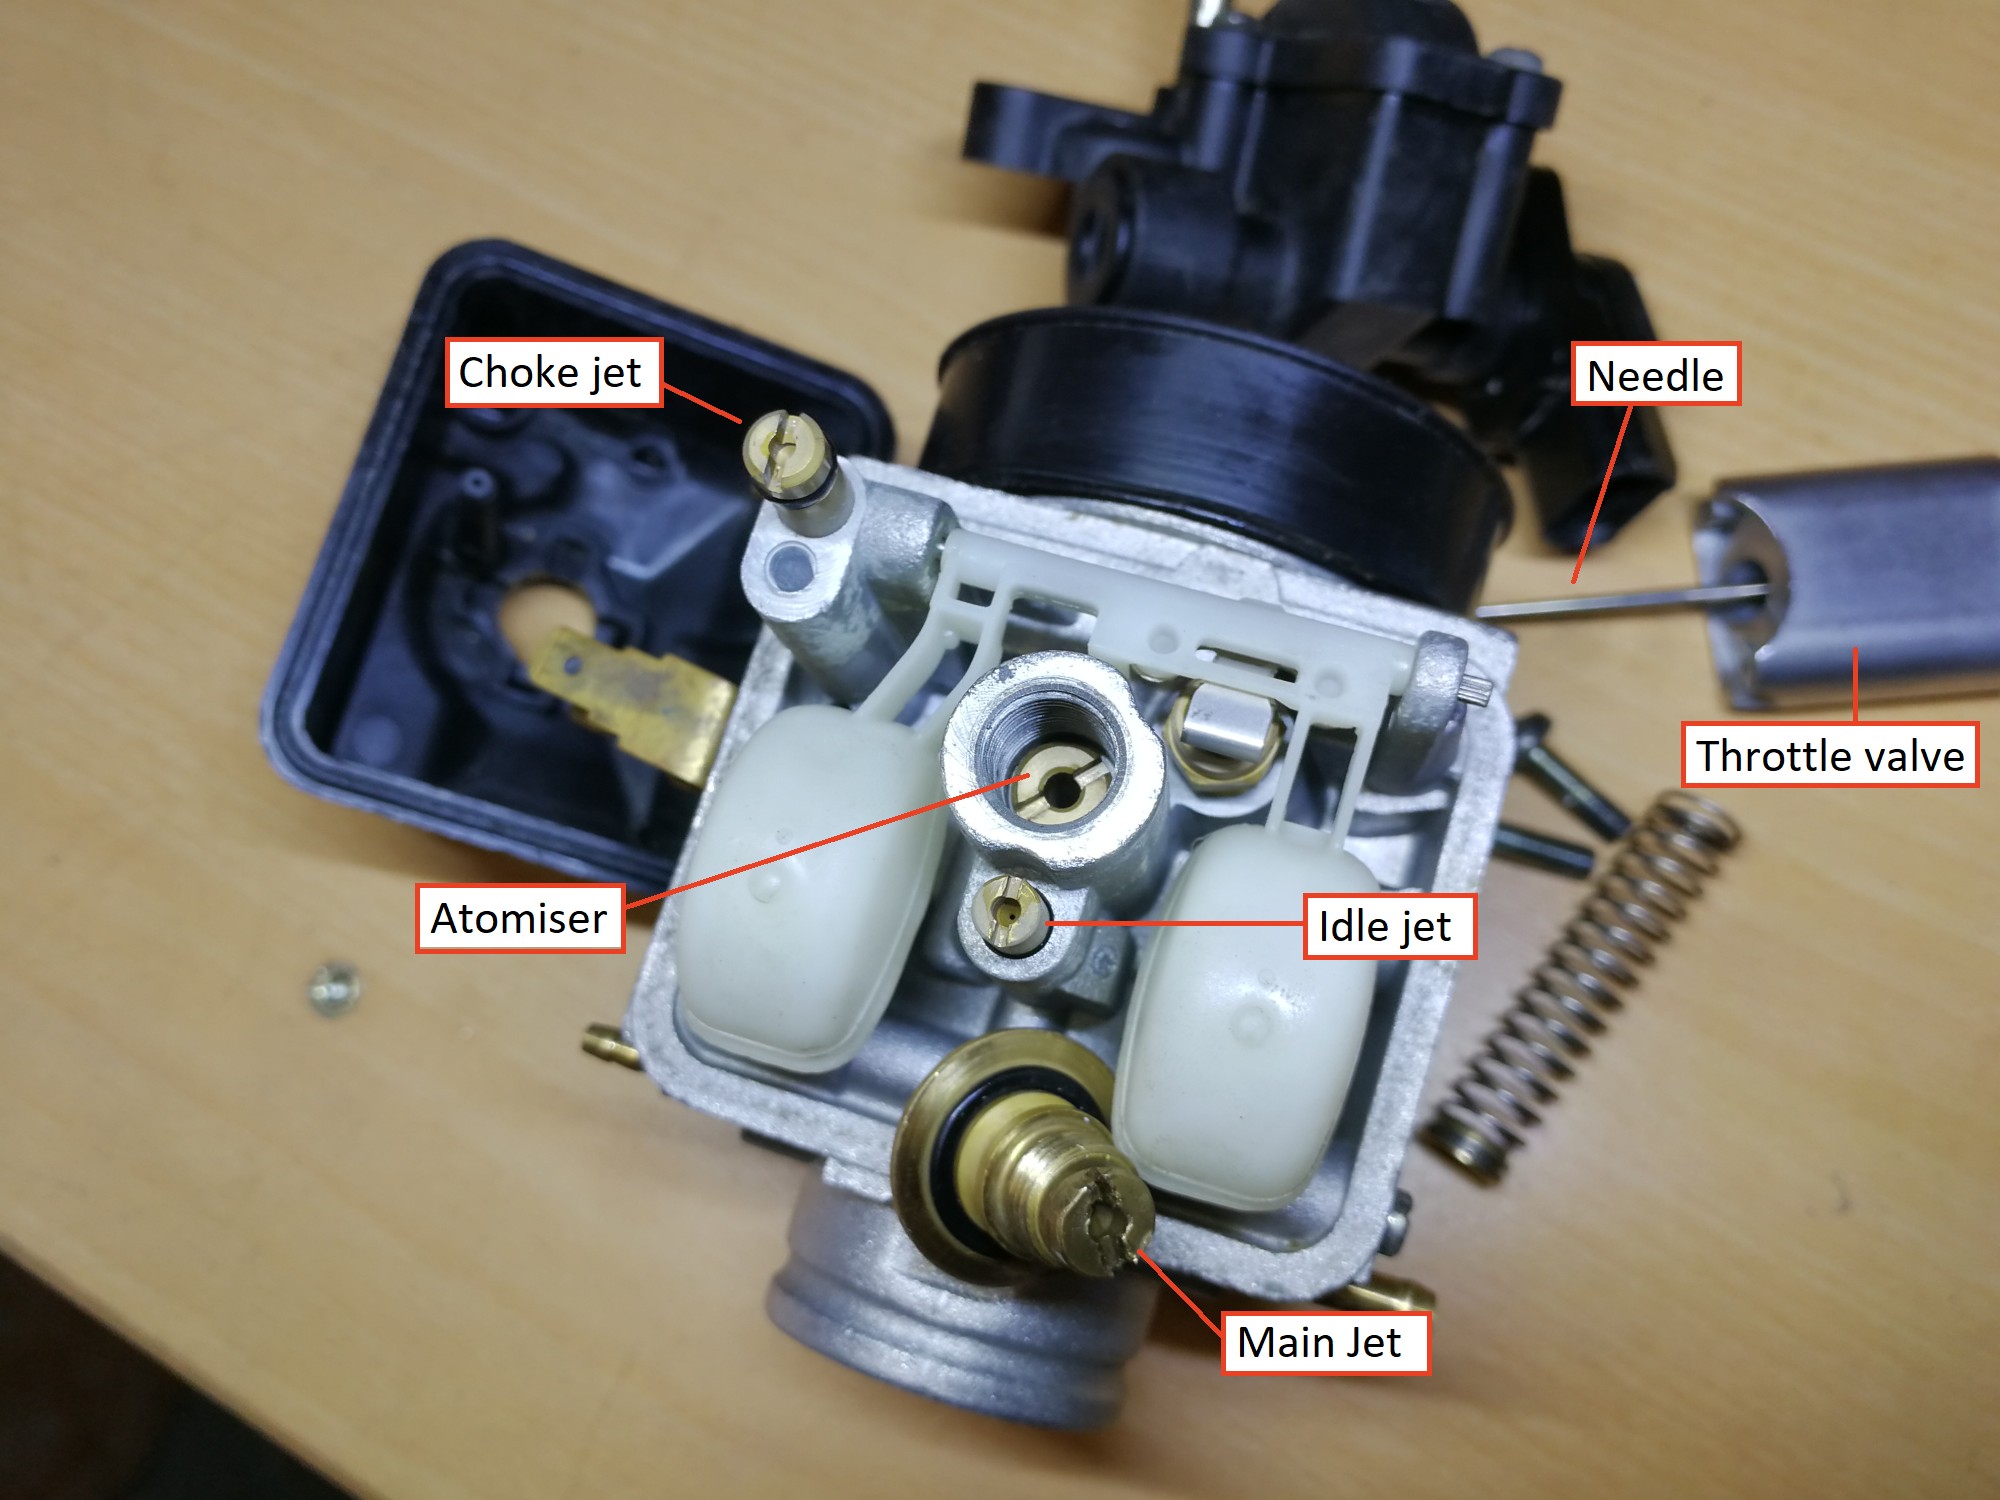
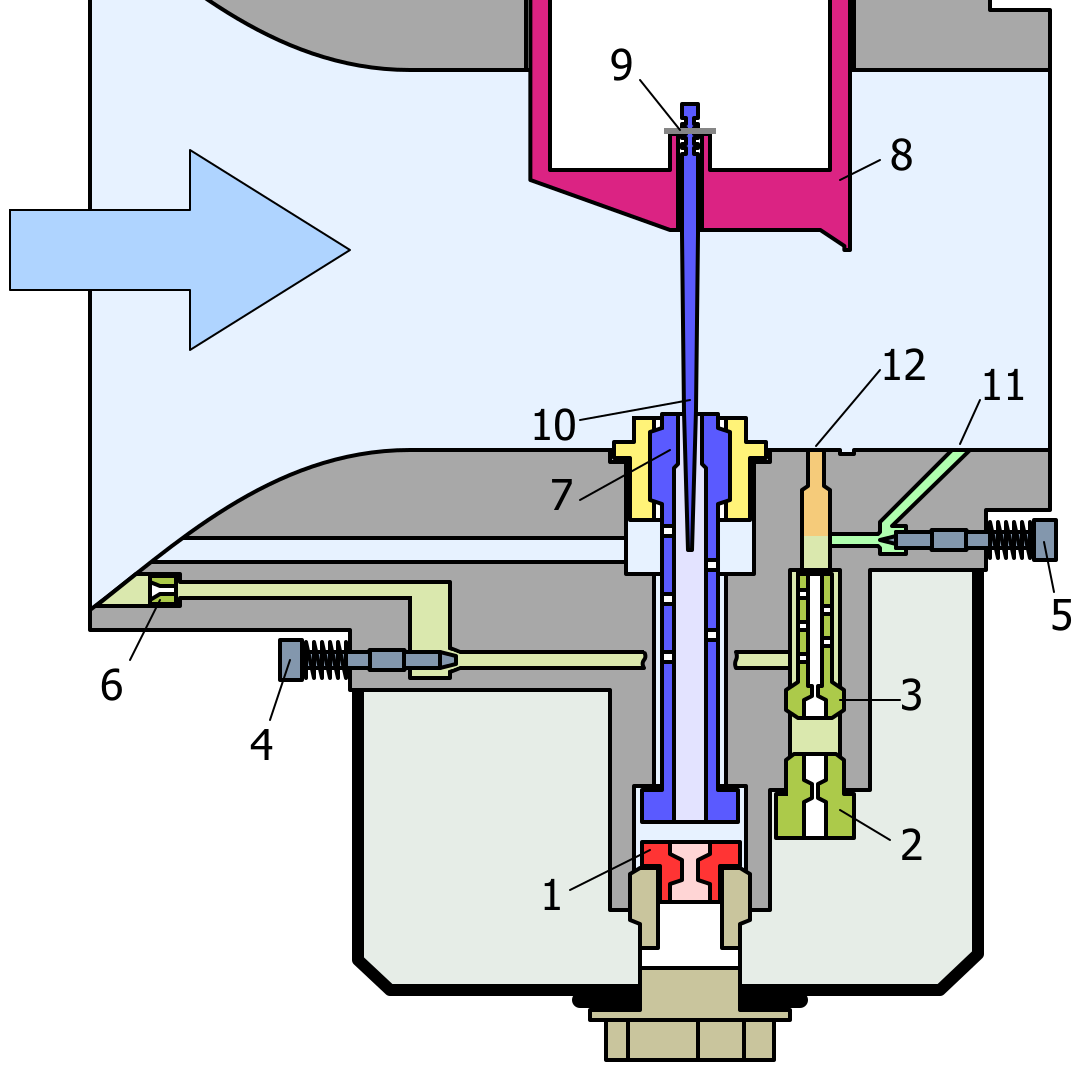
The Dell Orto slide carburetors installed in the RS 125 have several systems that affect the mixture composition at different throttle slide positions: The idle system, the progression system, the throttle slide, the needle and atomizer, and the main jet. Which system influences the mixture composition in which range is shown in the following diagram.
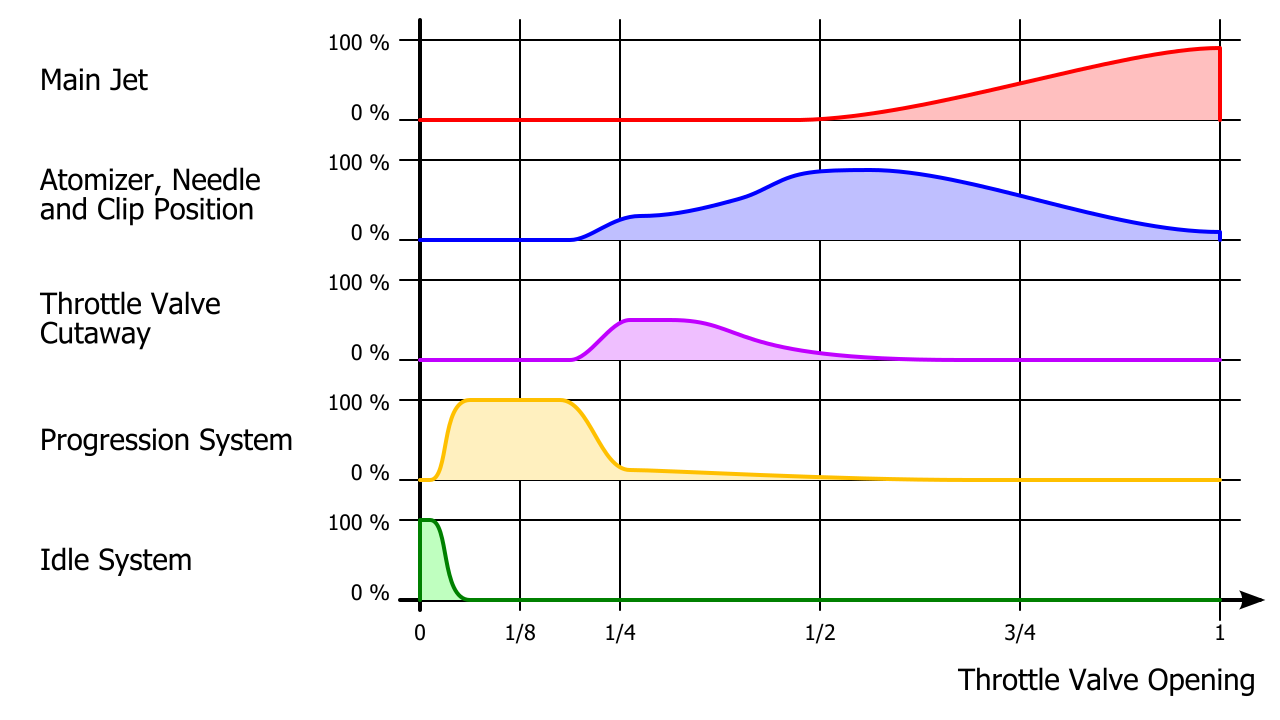
This chart can be found in a similar or general form for other carburetors, it is only schematic for the Dell Orto carburetors of the RS 125 and not created by measurements or calculations.
The construction of the three carburetors installed in the RS 125 is quite similar, the VHSB 34 has no central screw with the main jet for the float chamber but four screws to fix the float chamber.

The way these systems work and the settings on the individual systems are explained in more detail below.
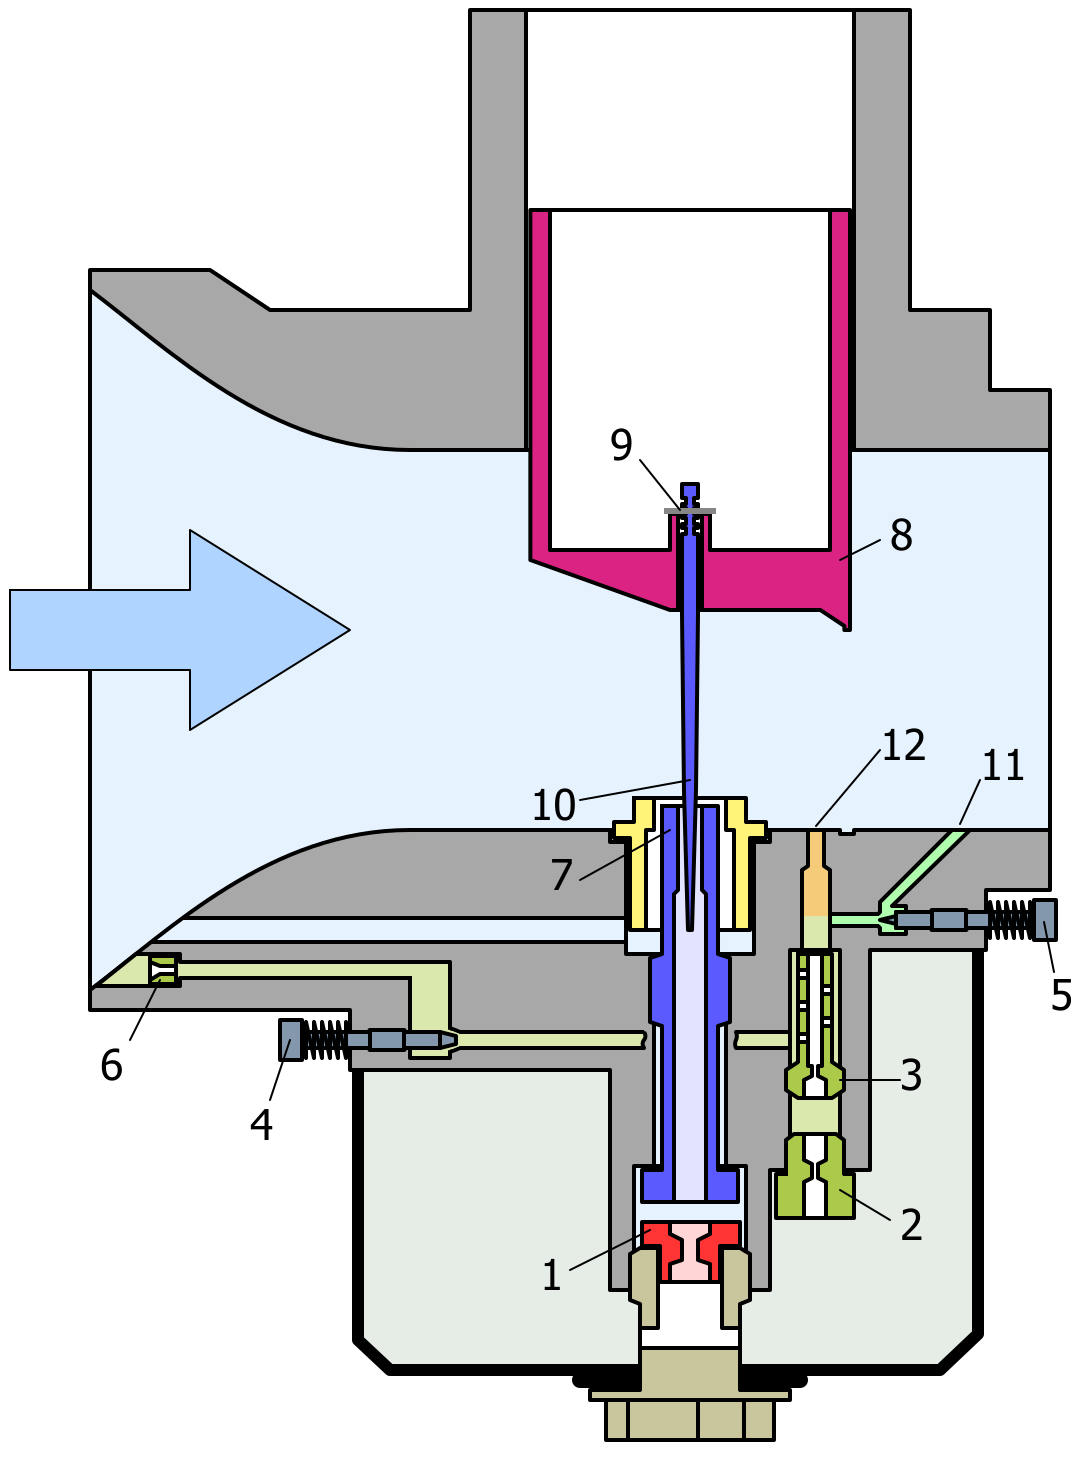
Idle and Progression System
The idle system only works when the throttle valve (8) is closed. Air is drawn in through the progression channel (12), mixed with the fuel air mixture from the idle mixing tube jet (3) and fed to the engine via the idle channel (11). When the throttle slide is opened slightly, the mixture from the idle mixture jet is drawn through the progression channel (12) below the throttle slide. The idle jet therefore influences both the idling and the enrichment phase.


It must now be determined whether the carburetor has an idle air adjustment screw (4, VHSB 34 only) or a mixture screw (5, PHBH 28 BD and VHST 28 CD). The models with mixture screw (5) usually use a fixed idle air nozzle (6), which is missing on the VHSB 34 if the idle air adjusting screw (4) is present. Due to its function, the idle air adjustment screw is always on the air filter side, the mixture screw is on the engine side. None of the carburetors installed in the RS 125 has both adjusting screws.
The mixture screw only determines the amount of mixture that reaches the engine through the idle channel. It does not affect the amount of mixture supplied through the progression system.
The idle air adjustment screw regulates the amount of air to both the idle system and the progression system, when screwed in, both the idle and the progression become richer.
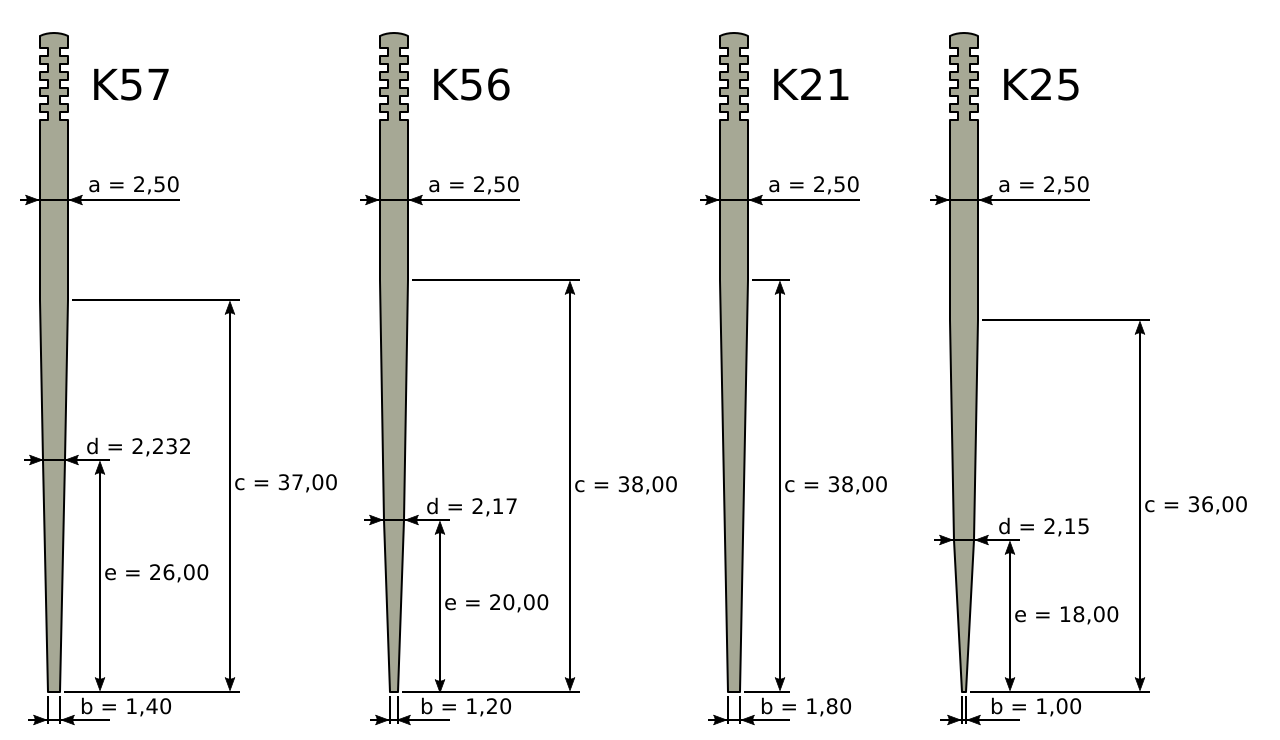
It is further possible to use mixing emulsion tube jet (3) and idle jet (2) or to install only one of the jets. Idle jets for PHBH 28 or VHSB 34 have a 5 mm thread.
The VHST 28 uses one single idle jet tube which is available from sizes 32 to 45 as type “U” or “S”. Type “U” has larger air channels on the side than type “S”.
The idle and the progression phase can only be adjusted by intuition if no CO meter can be used. A good indication here is the behavior of the engine when opening the throttle: If the engine reacts with a delay, the mixture is usually too lean (it revs up only very slowly and the drop in engine rpm is also very slow). Whether this is done by changing the idle jet, the mixing tube or the air adjustment screws, you have to try it out. Pragmatically, turning the adjusting screw is easier because you simply don’t have to remove it.
Throttle valve
From about 1/4 of the throttle slide position to full throttle, fuel is supplied through the main jet and atomizer. Exactly when and how this takes place can be influenced at low throttle slide positions with the shape of the throttle slide: The vacuum above the atomizer is affected by using different cutouts.
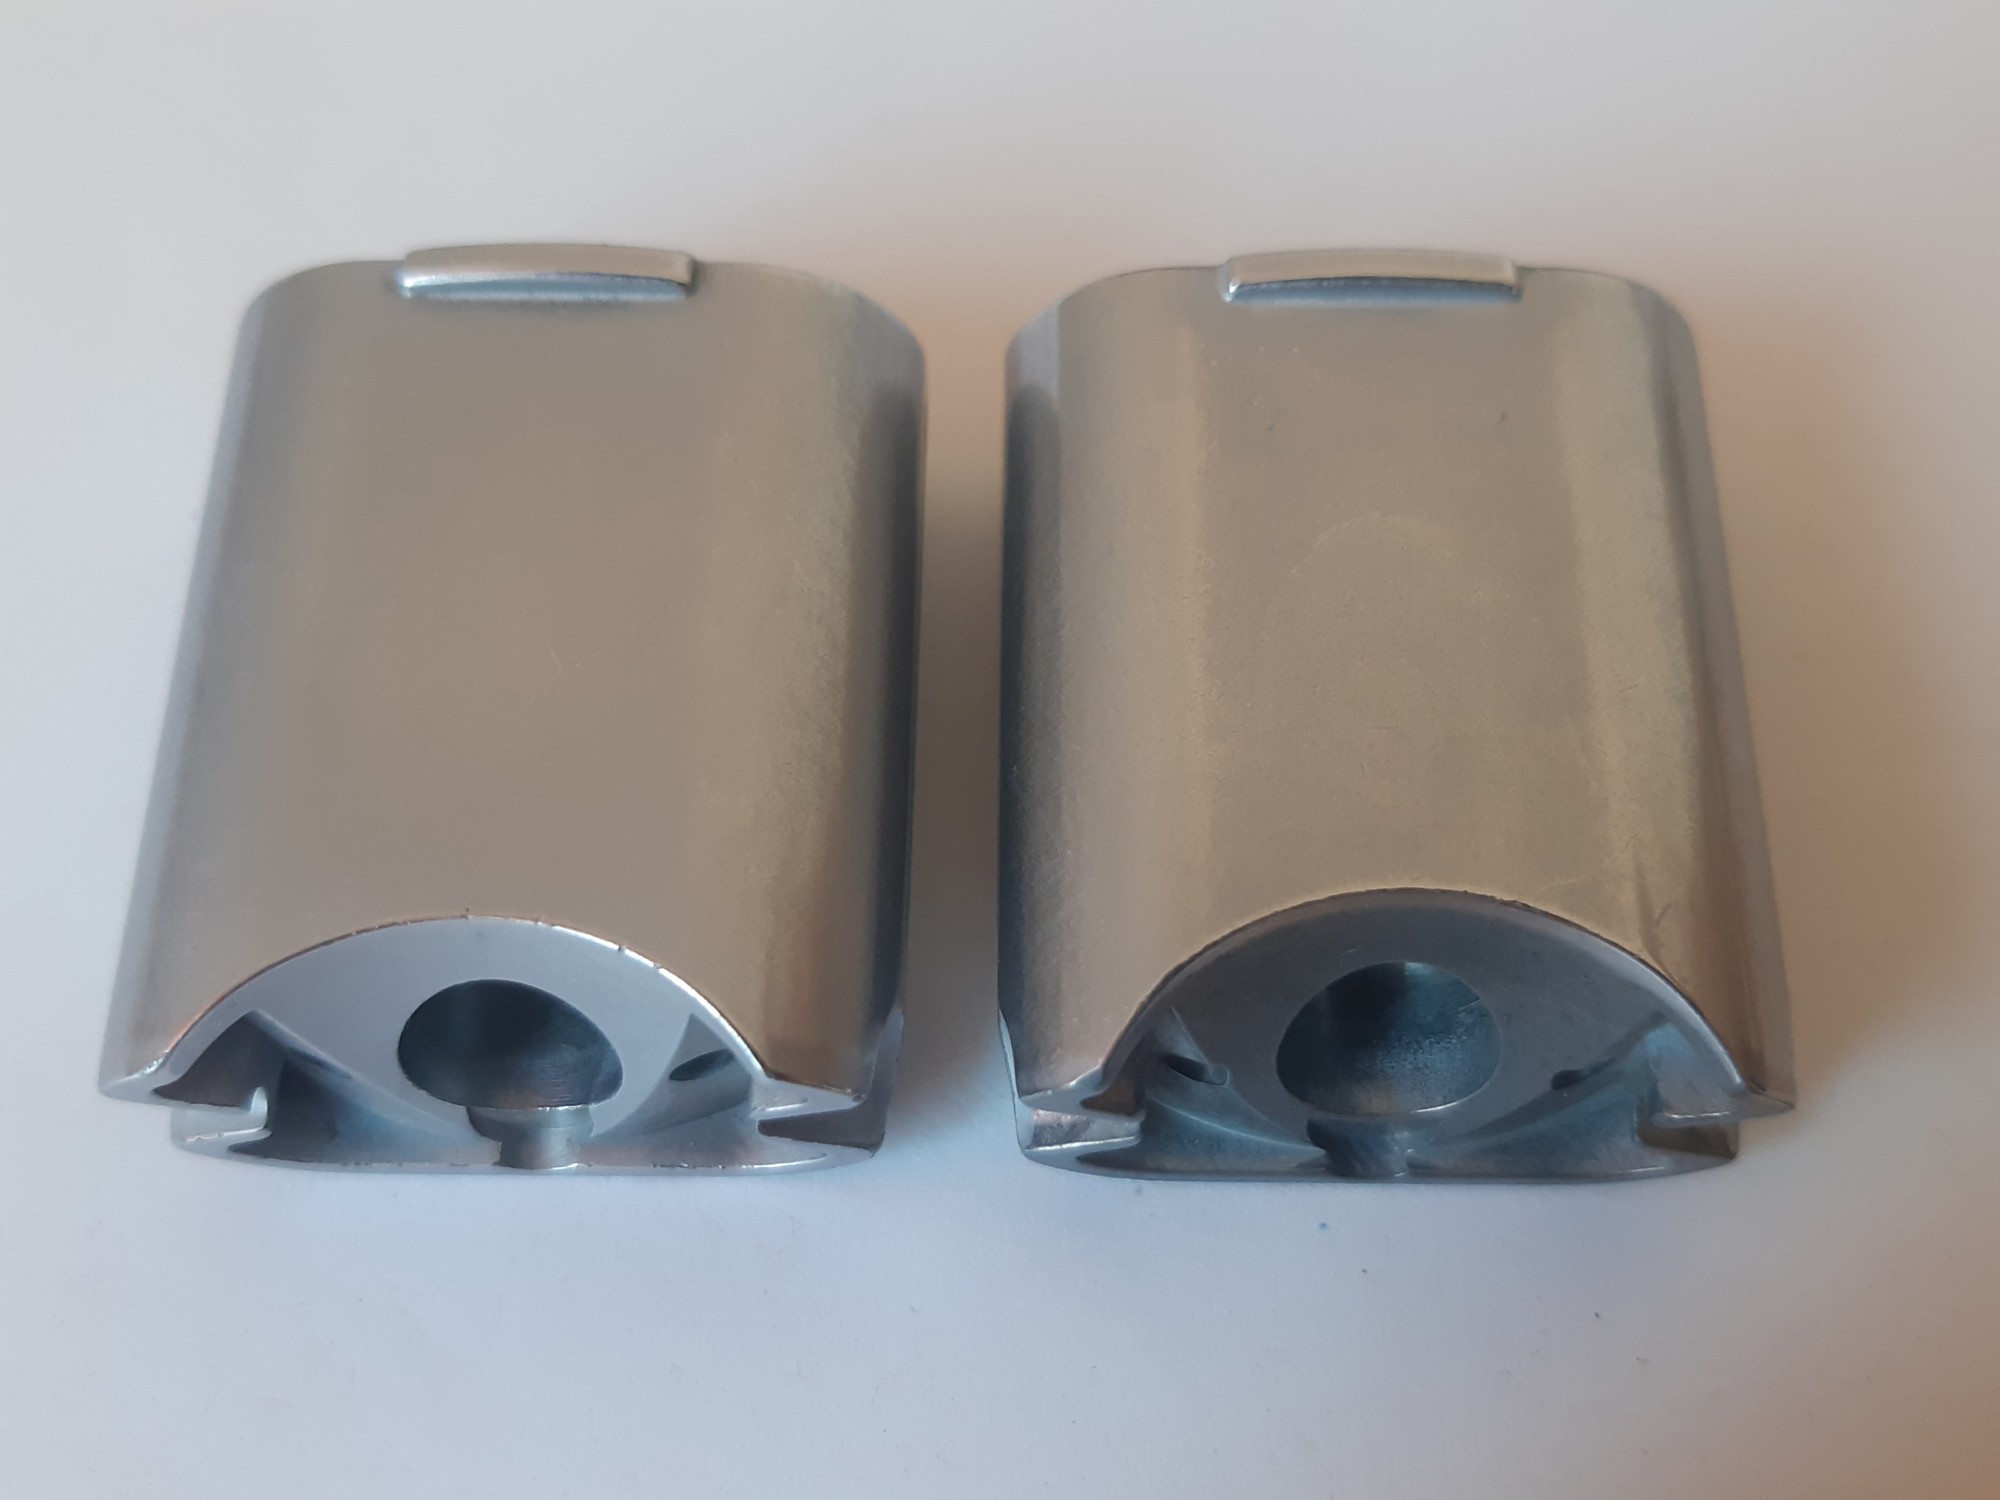
The throttle slide code indicates the height of the throttle slide cutaway. A larger throttle slide cutaway results in a leaner mixture, a smaller throttle slide cutaway results in a richer mixture at these throttle slide settings.
If starting at low engine speeds is only possible with cold start boost, this also indicates that the throttle slide is too large. Experience shows that this can already occur with throttle slider 50 on PHBH 28. In the case of stuttering due to too much gasoline in low speed ranges with tuning exhaust systems, a larger throttle slide can solve the problem.
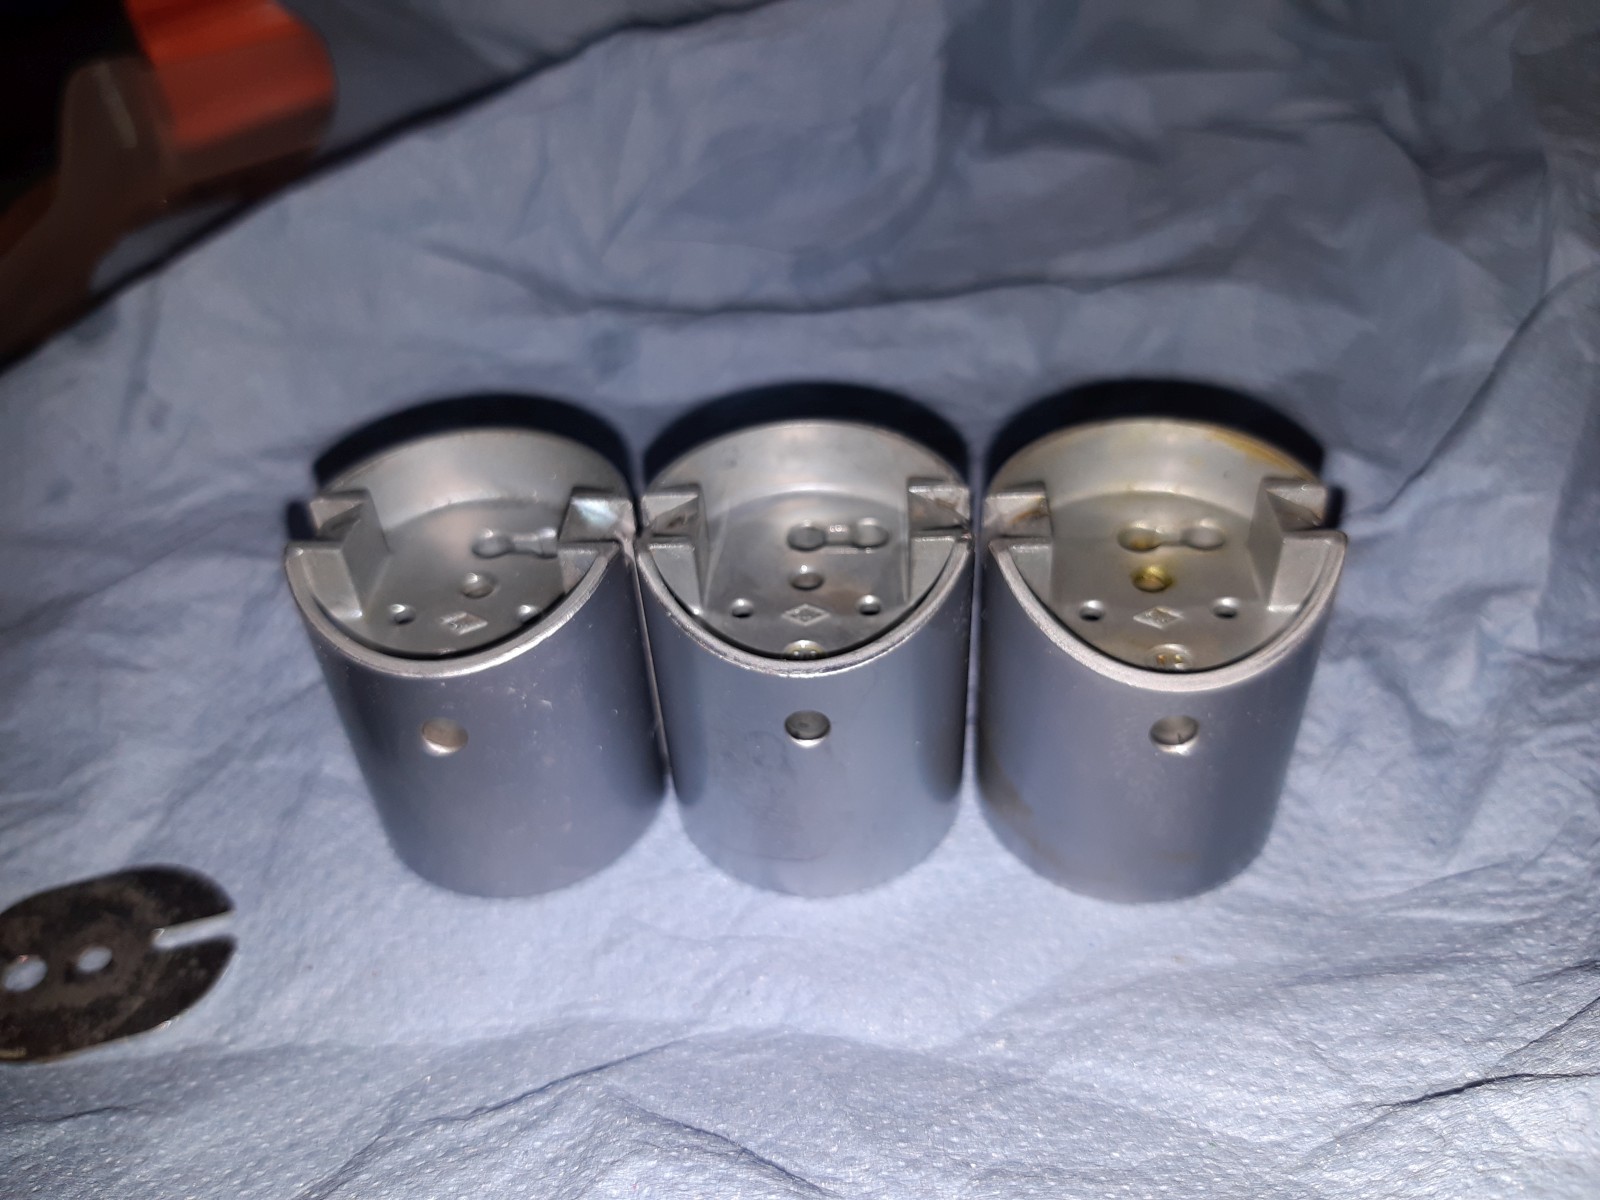
Tapered needle and atomizer
If the fuel is essentially mixed by the atomizer from about 1/4 of the throttle slide position, the needle clip positon, needle type and atomizer diameter have a significant influence on the mixture. You should always first try to improve tuning in this load range by moving the needle clip to a different notch. The needle clip position or notch is always counted from the top when you have the needle in front of you in the installation position. In this case, the mixture is leanest on the first notch. When changing the needle or atomizer, needle clip positions can only be compared theoretically.
Depending on the carburetor, there are different needles that were installed stock or are recommended, the following pictures show a selection for the three common carburetors.

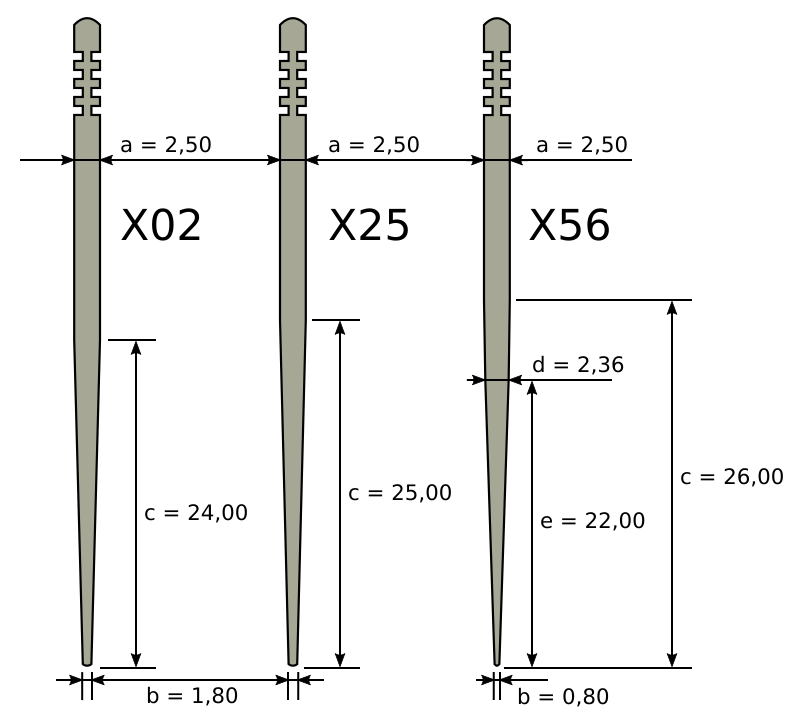
Of course, there are many other needles that can be used for precise adjustment. Practically, however, it is advisable to first test different needle clip positions with different main jets before testing a different needle, as the different needles have completely different characteristics.
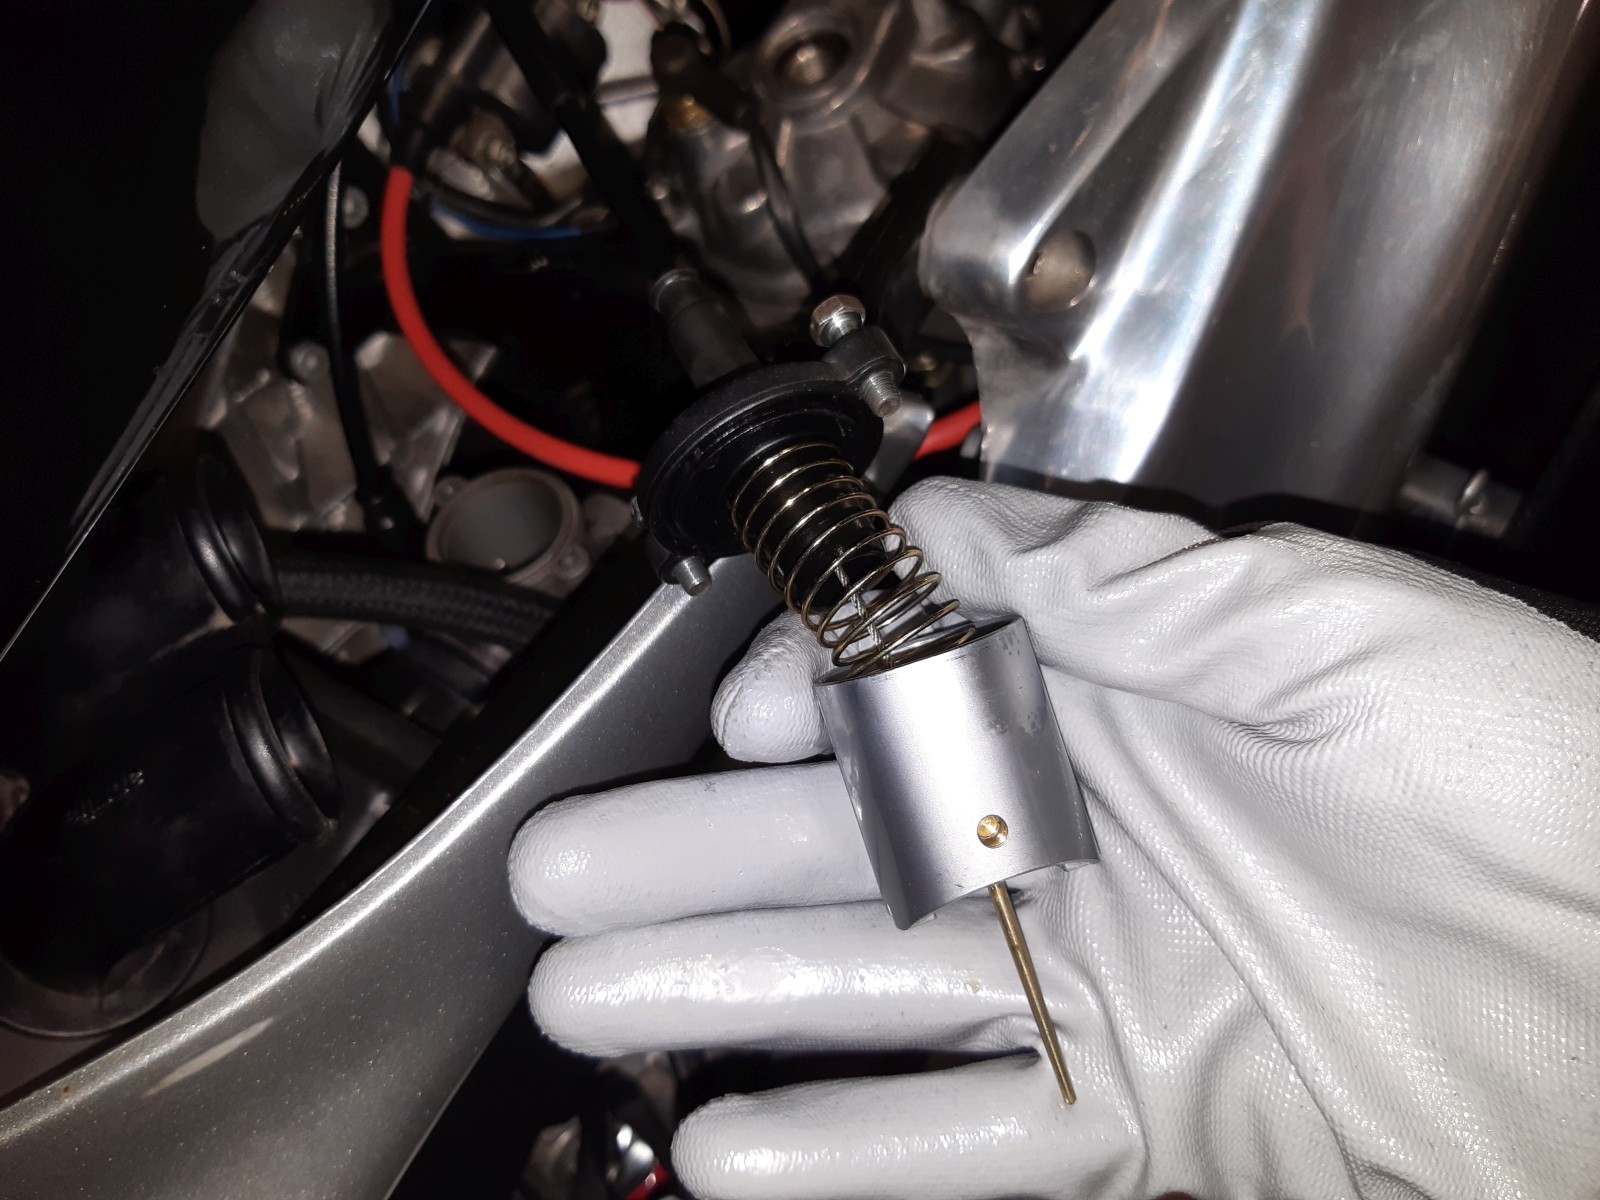
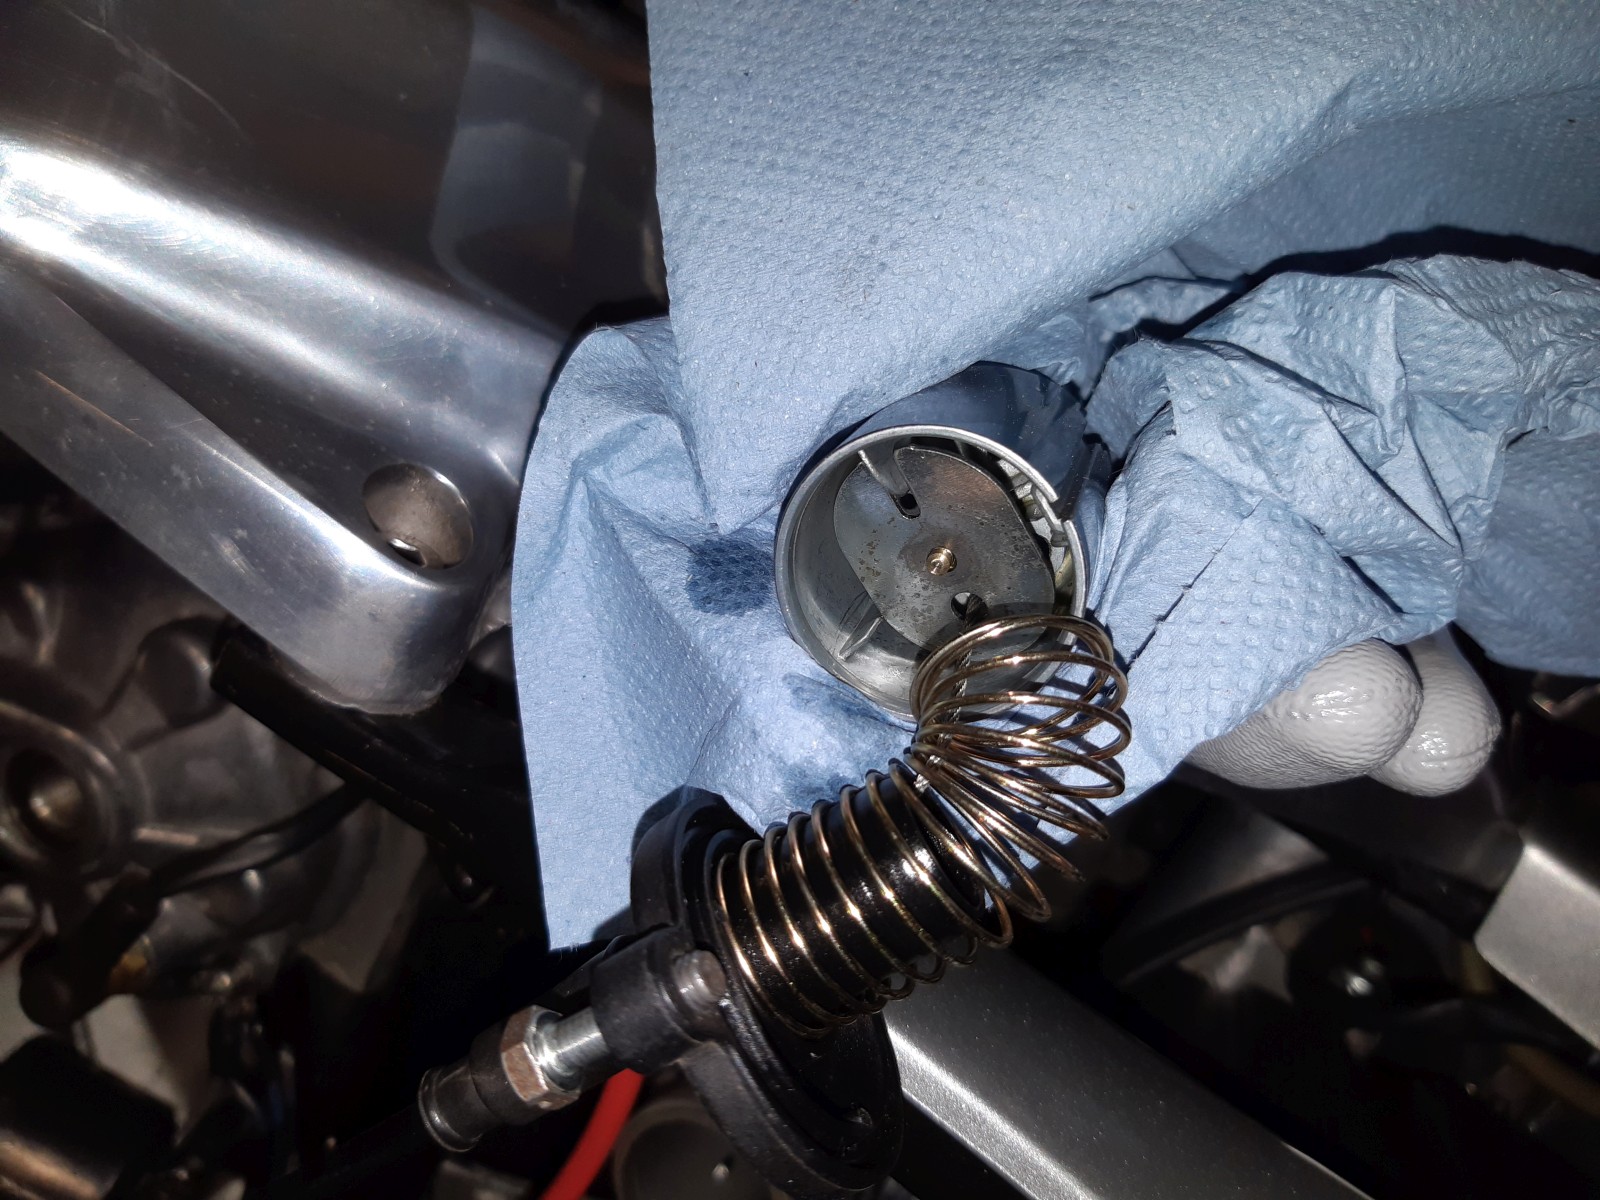
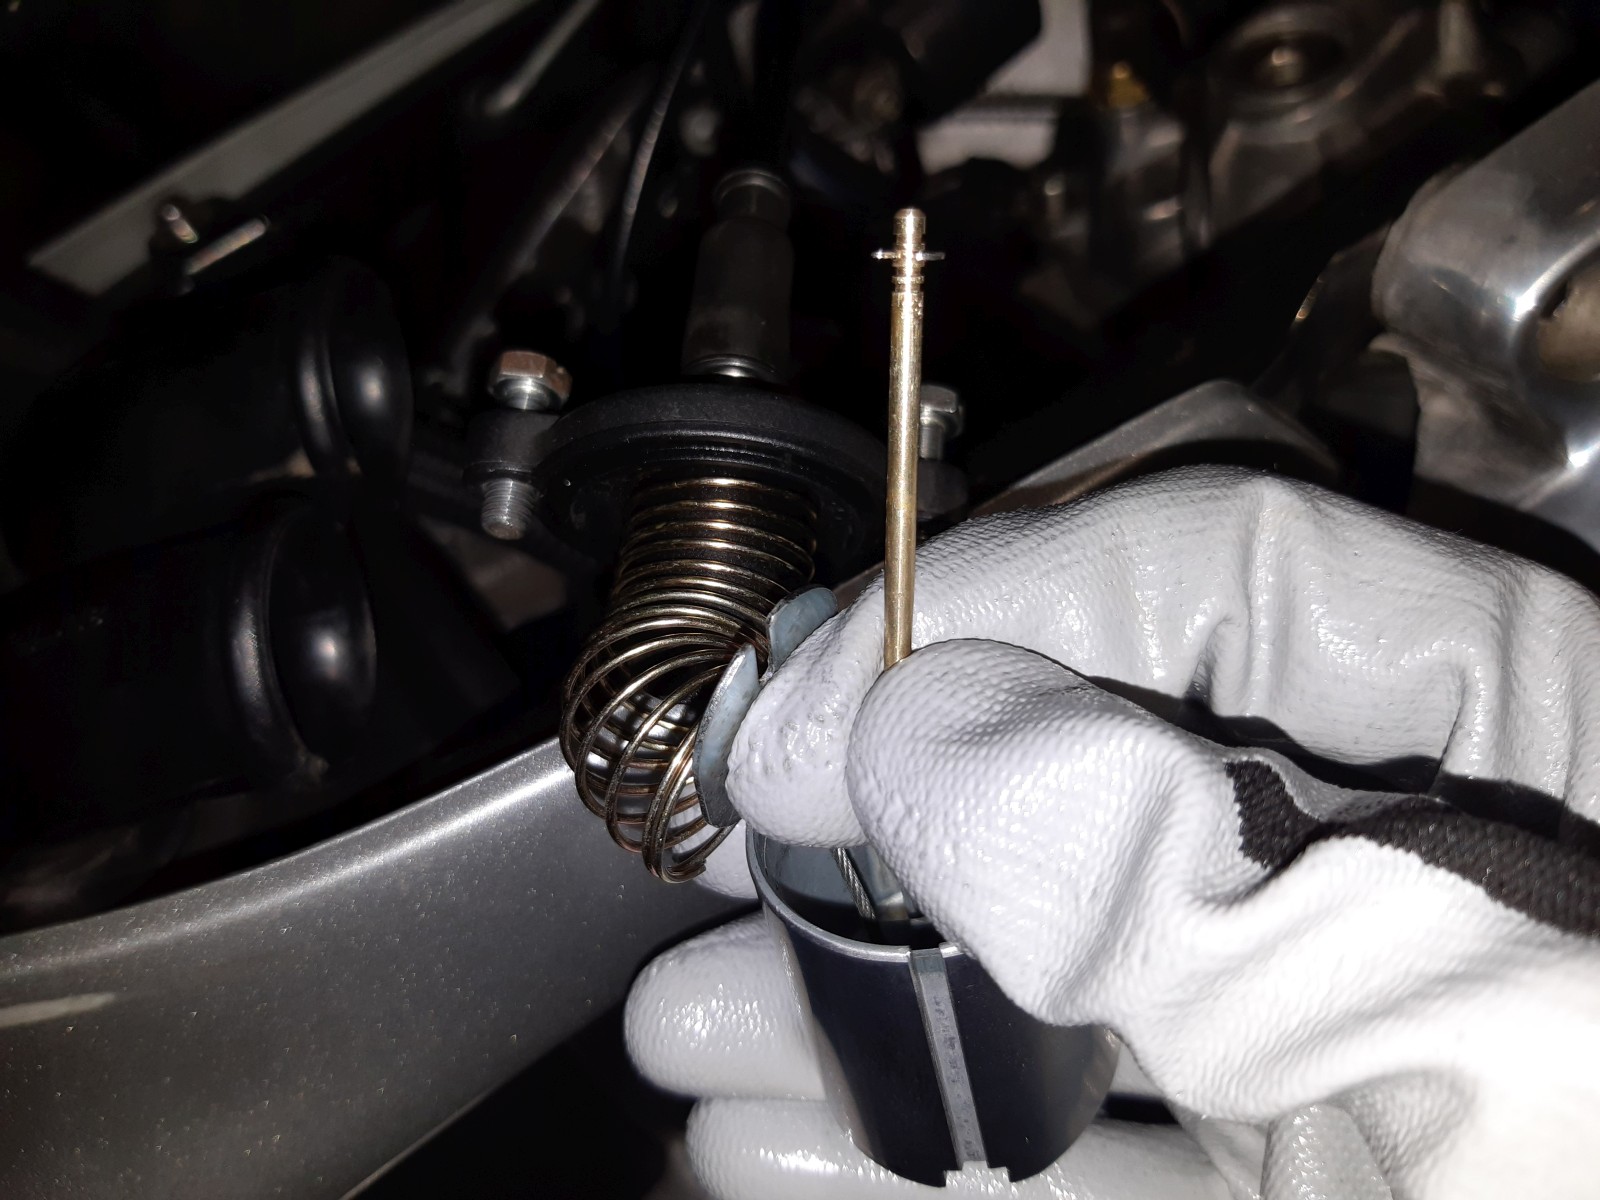
The needle can be replaced without much trouble, just lift up the fuel tank, loosen the screws on the carburetor cover and pull out the throttle valve. The spring hast to be pulled back (you can put it on the edge of the throttle valve), the needle is located under the spring plate.

The VHST28 of the newer models is equipped with an atomizer, which mixes air already in the nozzle with the gasoline from the main jet. In the older models with VHSB34 and PHBH28 the mixing happens below the throttle valve in the venturi area for the first time.

The different atomizers have a significant influence on the mixture formation and also explain the completely different main jet size on the newer models of the RS 125.
The choice of needle and atomizer are critical at high engine rpm with reduced throttle valve position, this is where the highest temperature loads occur. This range must be carefully observed and can be monitored with an EGT meter (Exhaust Gas Temperature).
Main Jet
The main jet mainly influences the mixture at full throttle and can therefore be well tuned by looking at the piston crown pattern. It has no effect on idle and the progression system, the main nozzle size only becomes relevant at high throttle slide settings. Depending on the needle and atomizer settings, the needle as well as the atomizer system can also continue to play a minor role.
The problem with a too small main jet is that the engine runs very well in spite of the too small main jet and an hearable ringing only occurs with a very lean mixture. Checking the piston crown more frequently helps to verify the correct size of the main jet.
Common main jet sizes for each carburetor are approximately in the following range:
- VHSB 34 LD: 140 to 180, Default approx. 155
- PHBH 28 BD: 110 to 140, Default approx. 120
- VHST 28 CD: 120 to 185, Default approx. 160mit
All main jets in these carburetors have a 6 mm thread.
It is advisable to take fewer risks, at least with the main nozzle, and not to run the engine uncontrolled for a long time with a main nozzle that is too small. The engine will briefly survive a mixture that is too lean in the partial load range, but not with the main nozzle, here you should not make longer test runs with a mixture that is too lean.
The carburetor does not need to be removed to change the main jet. It is sufficient to dismantle the throttle valve and cold start device, loosen the clamp to the engine on the intake manifold and turn the carburetor. The contents of the float chamber are dumped out through one of the ventilation ports by pulling off the corresponding hose before turning it over (place a towel underneath).


There is usually a large amount of gasoline in the float chamber, you can close the fuel tap on the last ride about 500 meters before the finish to empty the float chamber during the last meters of your ride. I put a cleaning towel under the carburetor and then use the towel to remove various oil and grease residues (e.g. near the chain) on the motorcycle with the gasoline-soaked towel.
More hints and things to know
Even though many details are described here up to the enrichment system, it is often sufficient to vary the main nozzle size and needle position, so the focus should be on these adjustment options at the beginning.
It is not intended to open the throttle completely at idle speed. Due to the suddenly extremely low flow velocity, the mixture may no longer be formed and the engine will stop. This behavior is completely normal. Efforts to tune the carburetor for this are counterproductive and may end in a mixture that is much too rich at idle and in the progression phase.
You have to take the risk that changing the carburetor jetting will result in a mixture that is too lean, otherwise you won’t find out with which setting the mixture became too lean. As long as this happens in the context of short test drives (a few kilometers!) and it is also determined that the engine actually ran too lean, you are still far from engine damage.
The quality of the gasoline plays a significant role. If the fuel remains in the tank during the winter and the float chamber remains filled, parts of the fuel settle and other parts evaporate. The engine then runs much worse. If the fuel tap is open, additives in the gasoline may even concentrate in the float chamber as the gasoline itself evaporates. E10 fuel is unsuitable for the RS 125. For carburetor setup, you should also not use old fuel from any old canister.
The fact that a lot of patience and many attempts are required for setting up the carburetor is simply part of the process. Alternatively, there is always the option of having the motorcycle tuned at a few specialist workshops with measurements on the dynamometer.
Unfortunately, experience has shown that some car and motorcycle workshops do not perform carburetor tuning. In some cases, customers are reluctant to pay for the necessary hours, and in others the competence has simply been lost. A carburetor tuning is not a simple step and cannot be compared with the exchange of parts or the connection of a diagnostic device, accordingly a high expenditure of time must be expected. Unfortunately, it is not uncommon that you can not find a suitable specialist company in your town.
If the spark plug is removed very often, I recommend using anti-seize lubrication on the spark plug thread to prevent damage to the thread. The specified tightening torque for the spark plug is 20 Nm with dry thread, with lubricated thread I use approx. 15 to 17 Nm.
I want to say thank you for all the knowedge consolidated here. I have a used 2007 RS125 trackbike with uknown history. It hase a 140cc kit of some sort. It runs and starts fine, but it has stuttering in sweeper corners at the local kart track. It isn’t possibleto ride it n this one corner efficiently or smoothly.
For now I am figuring out what carb is in the bike now. This write up is very very helpful getting me started. Thank you for taking the time to organize the information and share it. I live in the United States and there isn’t much community here to give and take knowledge from. I will post what I learn on youtube in hopes it is helpful to others. If you are agreeable I will post a link back to your source info here. This is such a wonderful investment of your time.
Thanks a lot for this 🙂 Sure, you can link to this page, also thanks for that! Glad it helped you
can you please reply or contact me about bigger carb options, my 07 with 28mm carbs is playing up pretty bad & being hard to set up since sitting around & now getting a 140cc topend kit. I have many years superkart racing experience, but it doesnt fully help my Dellorto understanding
Cold start problems,
Hi I bougth a 2008 mod rs 125. And I have cold start problems. We cleaned carburetor but ut did not help.
The bike have original 28mm carb. Removed restrictions in the exhaust, air box and a bigger nossle in the carb. Will it help to adjust air mix screw?
i am in the unviable postion off having to reset my carb and im not enjoying it all, i really F’d up when i stipped it down to clean it after 6 years off inactivity, my neighbour agrees it is a fuel issue from the carb as it starts on Ez start but quickly dies out, so i am just playing with the jet settings now hoping i find a combo that works, tho now i think about the diagram and pics i forgot the main jet